Raspberry Pi HQ as an All Sky Camera
2020 Nov 21 - Brian Kloppenborg
Over the last two months, I’ve been experimenting with the Raspberry Pi HQ Camera to determine is suitability for cloud monitoring, wide-field photometry, and detecting bright moving objects (meteors, airplanes, satellites, etc.). I’m happy to report that it works, although it is not ideal for any of these use cases.
Background
Back in July 2020, a colleague of mine alerted me to his post on the AAVSO forum in which he described his work using the Raspberry PI HQ Camera as an inexpensive cloud monitor / all sky camera. His initial results using the HQ Camera, a 120-degree fish-eye lens, and 30 second exposures were quite good. Not only could I see stars down to V~4.7 but also some clouds. His subsequent posts showed that the sensor had decent potential.
The Raspberry Pi HQ Camera consists of a Sony IMX477 CMOS sensor which is connected to a Raspberry Pi via. a Camera Serial Interface (CSI). The specific CSI implementation in the HQ Camera is a 2-lane CSI-2 bus; however, the sensor itself provides 4-lanes. The IMX477 is a back-illuminated color (RGGB Bayer) CMOS sensor. Although the sensor has 12.93 MP (4072 x 3176) worth of pixels, only 12.3 MP (4056 x 3040) pixels are active. The sensor has 10-bit and 12-bit A/D conversion on the chip, a built-in temperature sensor, controllable analog gain, and built-in image processing. The built-in Integrated Signal Processor (ISP) provides a Defect Pixel Correction (DPC) function. While good for photography, this function tends to suppress stars whose light tends to focus on a small number of pixels. The impact of DPC in Sony sensors is so strong that it has been called a star eater algorithm. Fortunately, the Raspberry Pi developers have created a simple command which disables the DPC.
The Raspberry Pi’s primary interface with the HQ Camera is via. the
raspicam
suite, using commands like raspistill and raspivid. Inspecting the
source code for raspistill
reveals that these programs used the
Multi-Media Abstraction Layer (MMAL)
API to request data from the camera. It should be noted that the camera can also
be accessed via. the v4l2 API as well, although I haven’t spent much time
investigating that API.
Equipment and Setup
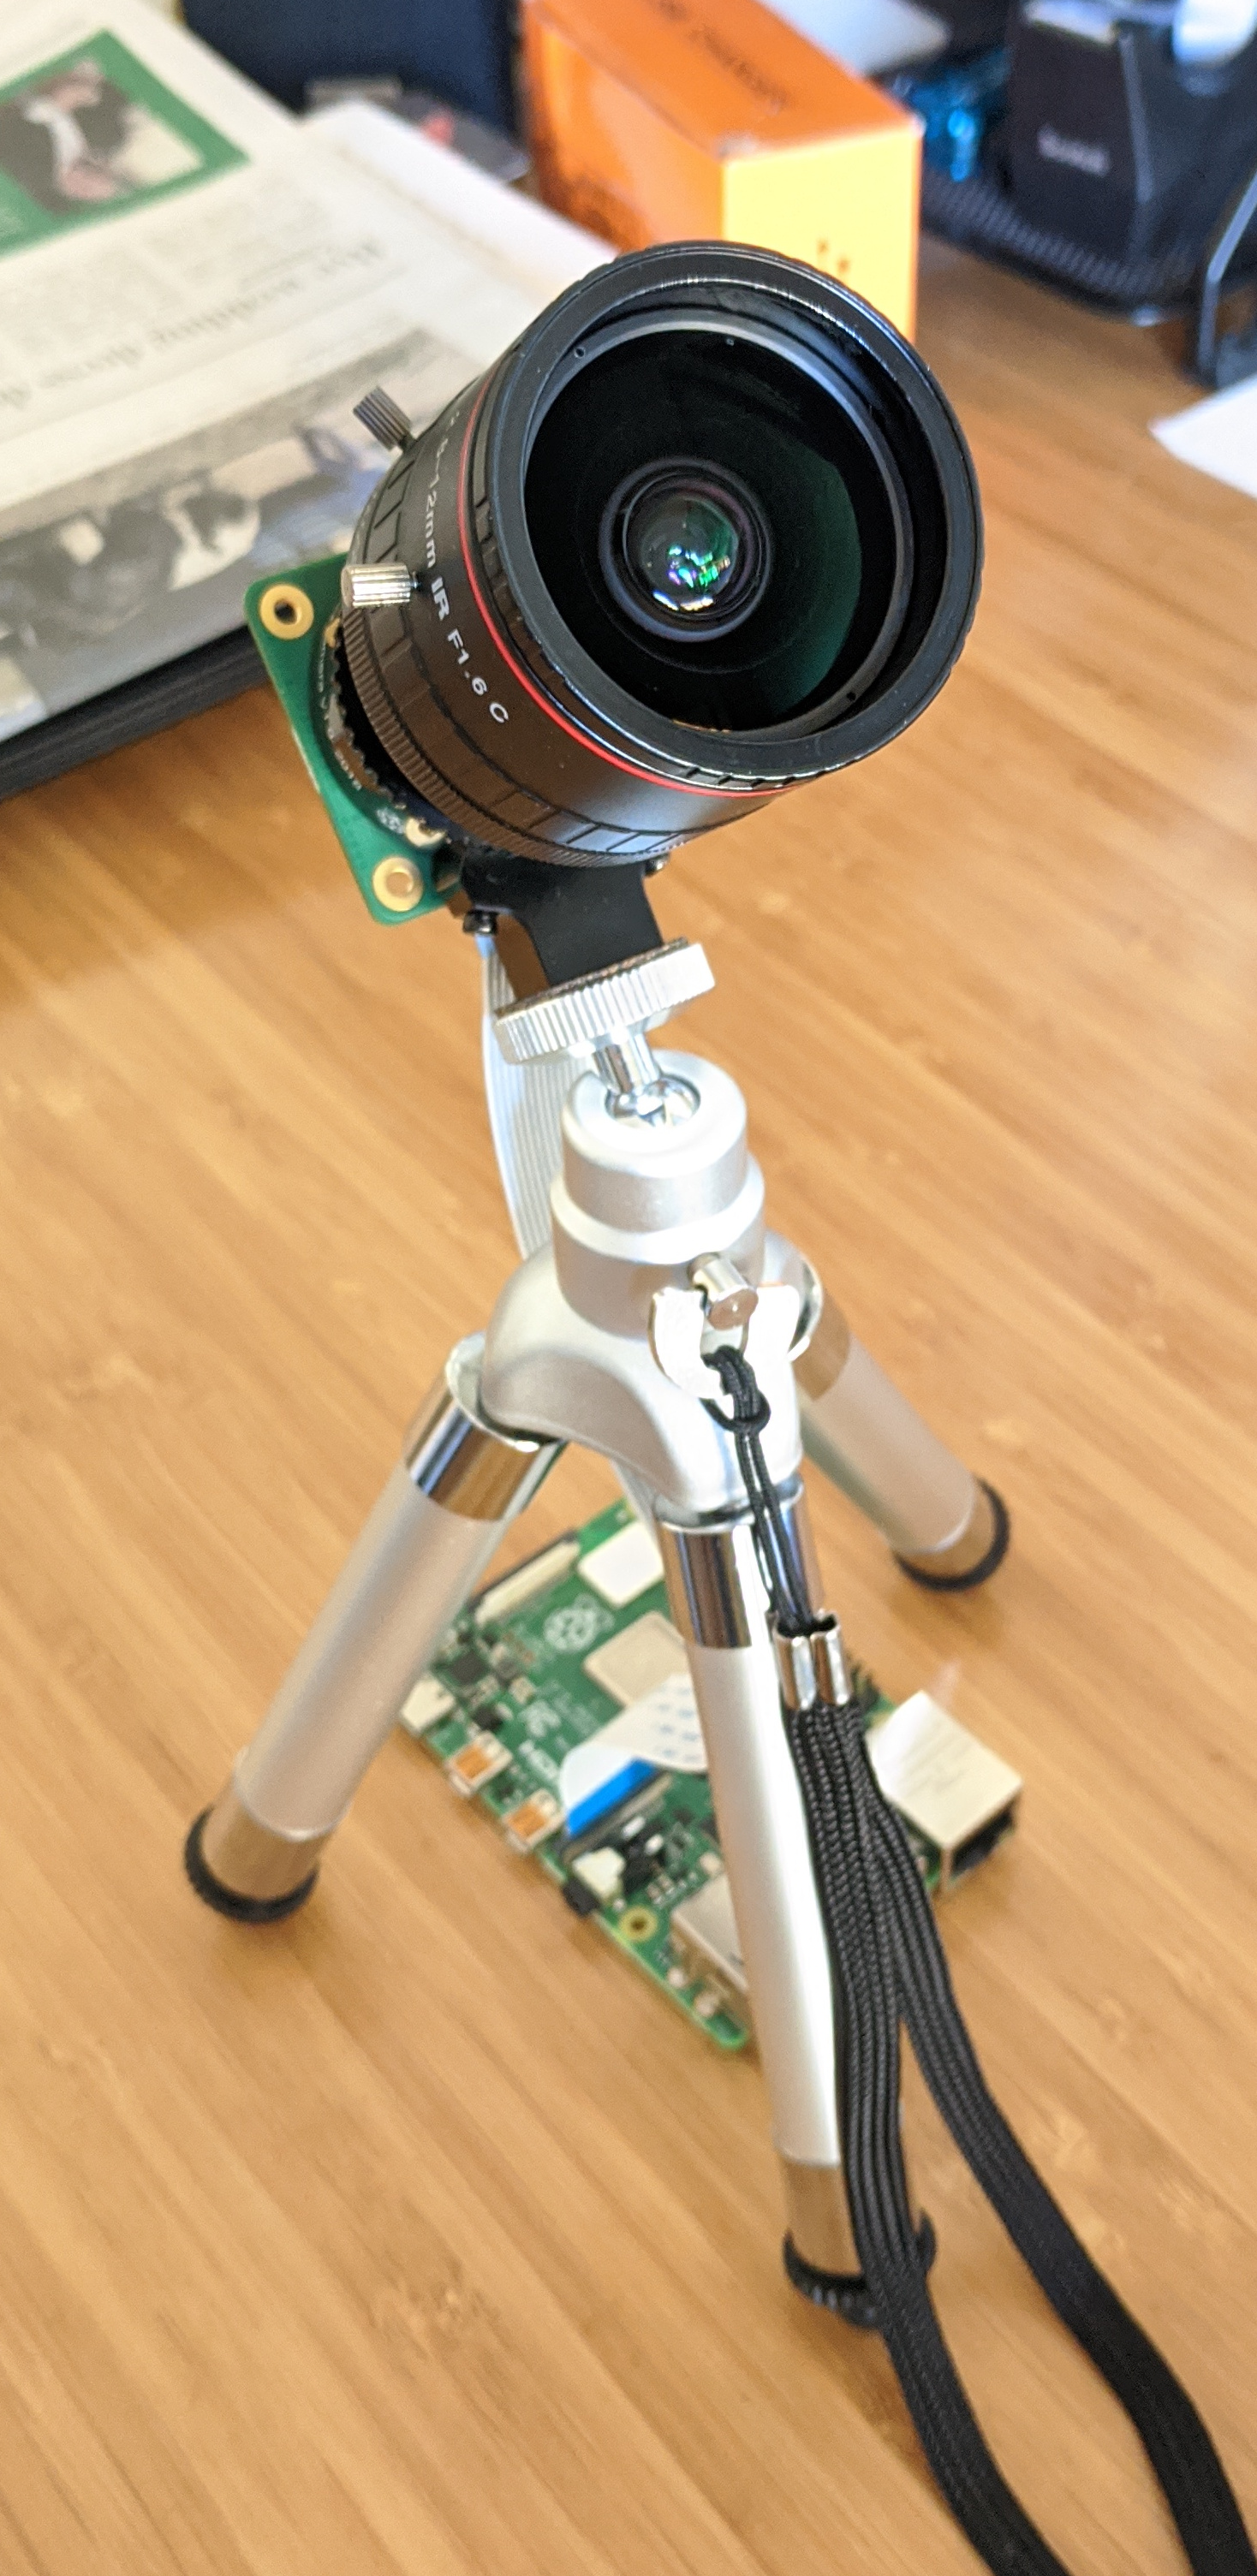
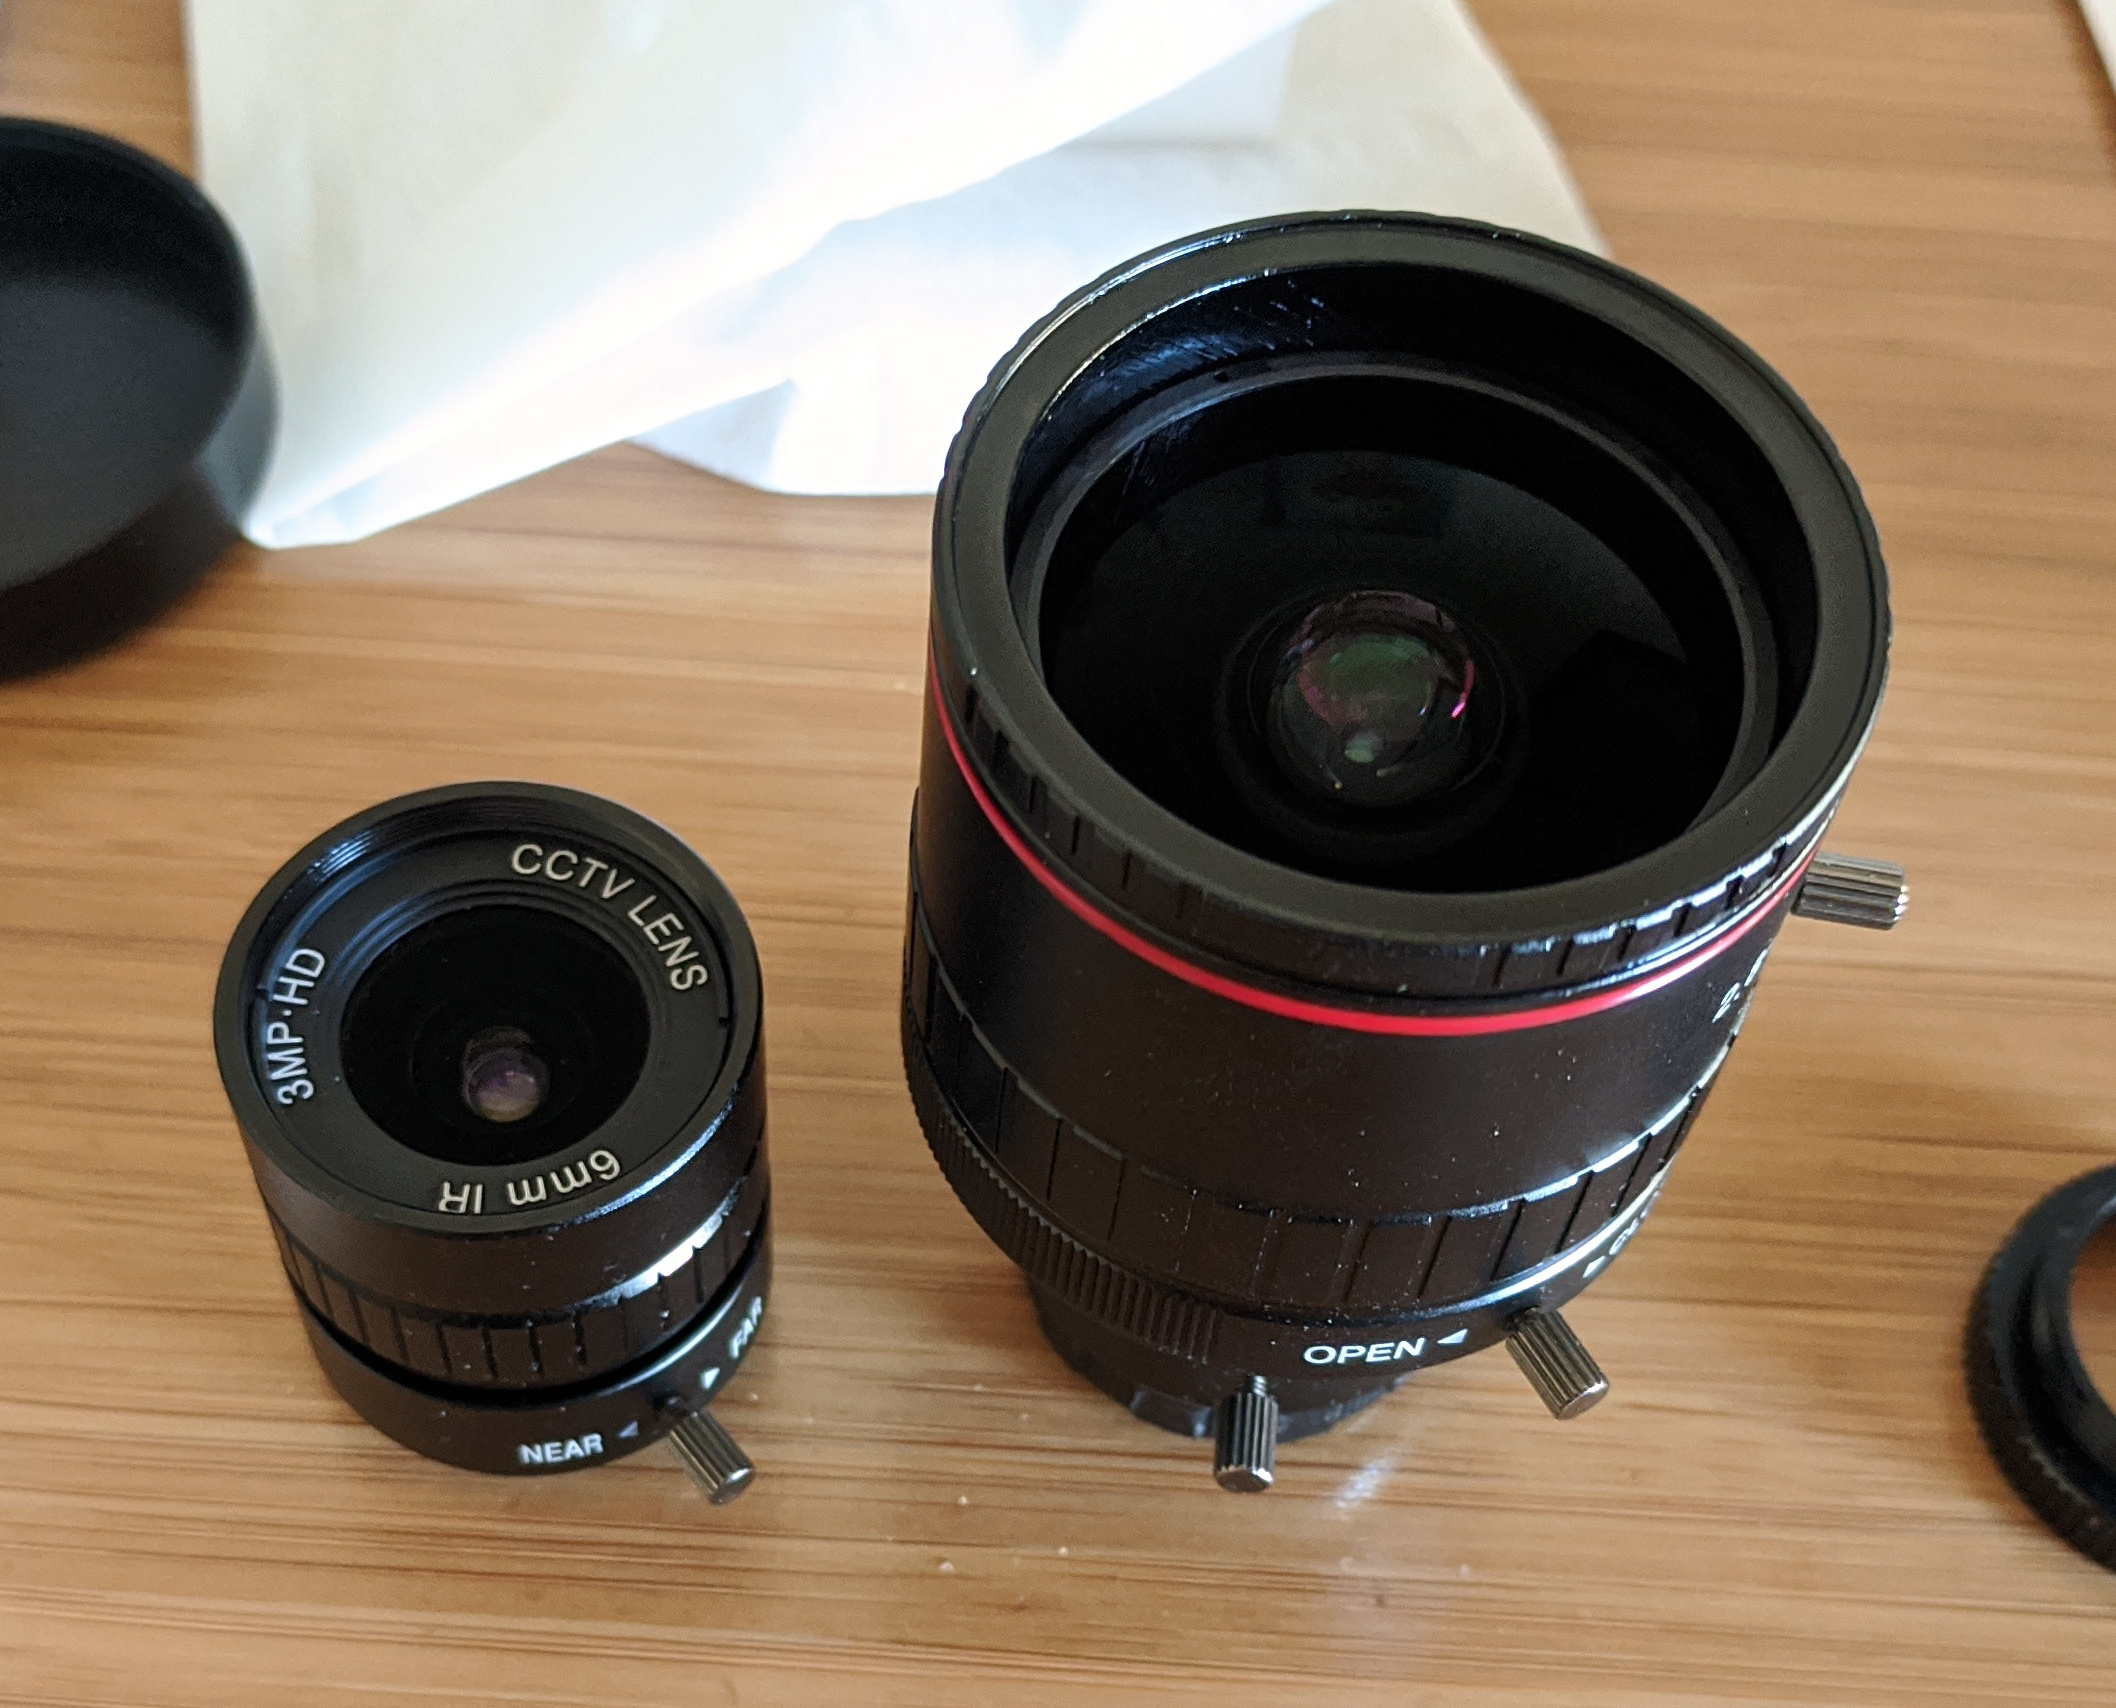
In these experiments I used the Raspberry Pi HQ camera mounted on a tripod. The camera was connected to a Raspberry Pi 4B with 4 GB of RAM. I used two different lenses to acquire sample data. The “stock” 6 mm “wide angle” lens that is produced by CGL Electronic Co. provides a 64x49 degree FOV with 53 arcsecond per pixel resolution. The Arducam 2.8 - 15 mm vari-focal lens yields a FOV of 106 x 88 degrees with 114 arcsecond per pixel resolution. In this configuration, the Pi HQ is more of a “some sky” camera than an “all sky” camera, but if you were to install a 1.5 mm lens, you would get a 136 x 122 degree FOV which is similar to what you might find in a commercial camera. Both lenses connect to the C-mount ring on the Pi HQ Camera without adapters. Although significantly different in size, both lenses have similar apertures.

Prior to taking the camera outside, I plugged in all of the relevant wires,
installed the camera kernel module using raspi-config, and upgraded the
firmware using rpi-update.
| Item | Cost (USD) |
|---|---|
| Raspberry Pi 4 (4 GB) | 55 |
| Raspberry Pi HQ Camera | 55 |
| Stock 6 mm lens | 25 |
| 2.8 - 15 mm vari-focal lens | 65 |
A note on focusing
From the start, it was quite clear that getting good focus on this system was not going to be easy: the focus adjustment on the lenses are just too sensitive. After some experimentation, I found the easiest way to focus the camera is to first roughly focus the camera using the focus adjustment on the lens, then fine-tune the focus using the back focus adjustment on the HQ Camera’s main housing.
Below I describe the process I used to get the best focus possible. In these instructions I’ve assumed that you have read the Raspberry Pi HQ Camera Getting Started Guide and understand how to adjust these types of lenses. Basically, for every step you end up loosening a specific screw, turning the adjacent adjustment ring, and then tightening said screw with your fingers.
- Install the lens onto the camera housing.
- Unscrew the back focus adjustment ring until a gap of 0.5 - 1 mm develops.
- Fully open the iris on the lens.
- If you are using the vari-focal lens, set the focus adjustment to its widest setting (the lens will be at the top of the tube and may protrude slightly).
- During the daytime, use a distant object with sharp edges to roughly focus
the camera. This is accomplished by adjusting the focus ring while viewing
video/images from the camera. The closer you get this, the better. I would
suggest using
raspividto stream video as described below. - At night finish focusing the camera by adjusting the back focus while
inspecting images from
raspistill.
The raspivid command can be used to stream video from the camera when there
is sufficient light (e.g. daytime). If you have a Linux computer, you can stream
the raw data and use ffmpeg to turn it into a H264 transport stream to view
on your computer. The commands to do this are as follows:
On the Pi:
raspivid -fps 20 -w 1920 -h 1080 -t 0 -l -o tcp://0.0.0.0:2222
where the -w and -h commands specify the preferred resolution (the maximum
allowable values specified here already). On your (Linux) computer you can then
play the video using mplayer
mplayer -fps 200 -demuxer h264es ffmpeg://tcp://raspberrypi:2222
If you have a different operating system, you may need to use some other command.
Data Acquisition
After setting up the camera on the deck and turning on the Pi, I first shut off defect pixel correction with:
sudo vcdbg set imx477_dpc 0
Then I acquired a series of images of Perseus, centered on Mirfak, using
raspistill in time lapse mode. Images consisted of 10-20 exposures of 1, 2, 5,
and 10-seconds in duration. Data were taken in full-frame (mode 3) mode with
RAW output enabled using the maximum analog gain. I disabled all preview, image
processing, exposure correction, and similar image processing functions. To
reduce writes to the SD card, I wrote the images to shared memory (/dev/shm).
I also turned on date/time tagging. The resulting commands to raspistill
are as follows, but with changes to the exposure (--shutter) value:
raspistill -v --nopreview --exposure off --flicker off --awb off --imxfx none --quality 100 --raw --analoggain 16 --mode 3 --timeout 0 --timelapse 1000 --datetime --shutter 1000000 --output /dev/shm/data-%10d.jpg
Note that this command will yield a 4056 x 3040 x 12-bit image encoded in BGGR Bayer order.
Image Decoding
The datasheet
for the Sony IMX477 on Arrow provides a wealth of information on how the RAW
image data will be presented to software. Based upon this data, reading Jack’s
excellent post on how to
open Raspberry Pi HQ RAW images
using MatLab, and inspection of the source code for
PyDNG,
I created a Python module that reads the output from raspistill and
extracts the Bayer data and relevant metadata. I’ll discuss this software
in greater detail in a later blog post.
Data Analysis
With the RAW data in hand, I explored the sensitivity limits of the camera.
By visual inspection of the 10-second exposure, it was evident that I could
see images down to V7 with the 6 mm lens and V6.5 with the vari-focal lens.
Given that my observing conditions are far from ideal, I didn’t think this
was too bad.
CMOS sensors, like the Sony IMX477 used in the HQ Camera, tend to have lower noise at higher gain. As such, a commonly employed technique to improve the signal-to-noise ratio is to read out images frequently and add them together to create a longer effective exposure duration. This also has the added benefit of suppressing other sources of noise.
To evaluate this general observation, I performed a co-adding experiment where I created a synthetic 10-second exposure by adding 10 x 1-second exposures, 5 x 2-second exposures, 2 x 5-second exposures. These images were compared to a 1 x 10-second exposure. For each synthetic image, I found the average and standard deviation of a small region of the image that was free of stars. The results are shown in the following figure:
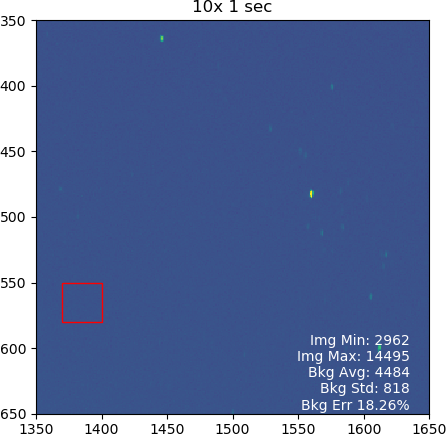
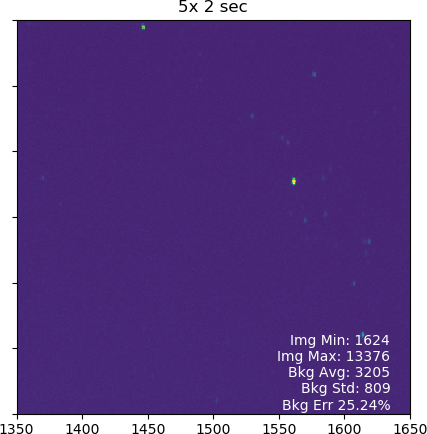
As expected, the co-added images contained less noise than the longer exposures. Do note that the brightest stars saturated in the five and 10-second exposures.
Clouds, Meteors, Airplanes, and Satellites
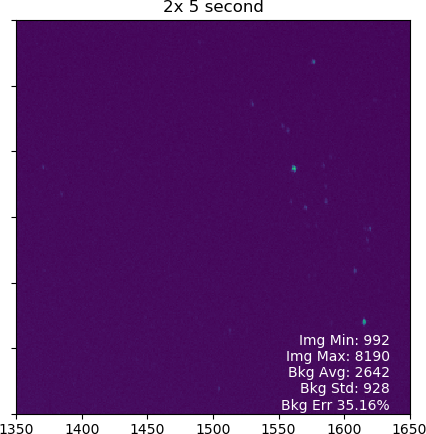
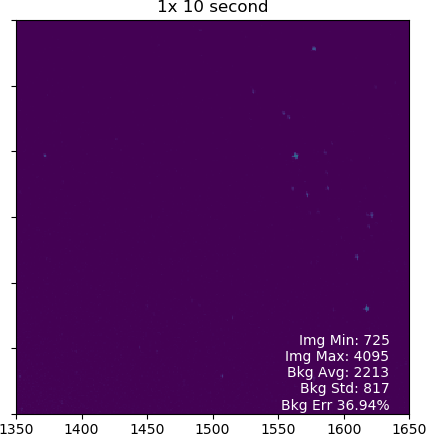
As stated in the introduction, I also wanted to use my camera to detect clouds, meteors, airplanes, and satellites. During my initial tests, I was able to observe several airplanes and a handful of satellites move through the field of view. Below I show examples of an airplane (with contrail) and a satellite moving through the field of view. The camera isn’t quite sensitive enough to pick out light cirrus clouds, but it can certainly see the heavy stuff.
Comparison with other all-sky cameras
As described above, I determined that the HQ Camera equipped with a 6 mm lens could reach V ~ 7.0 with a 10-second exposure. With the 2.8 mm lens, the magnitude limit was V ~ 6.5 with the same exposure duration. A colleague of mine uses the ZWO ASI174MM with the same vari-focal 2.8 mm lens and is able to get to V > 7.0 with a 1-second exposure.
While this doesn’t bode well with the Pi HQ camera, it is actually right in line with expectations. Indeed, the HQ Camera uses a Sony IMX 477 sensor which features 1.55 micrometer pixels whereas the ASI174MM uses a Sony IMX 147 sensor which as (huge) 5.86 micrometer pixels. The difference in surface area, about 14x, means the Sony IMX 147 collects significantly more light per unit time. Given the difference in cost for the sensors ($350 for the IMX 147 vs. $55 for the IMX 477), I’m willing to accept this difference in performance.
Conclusion and next steps
The Raspberry Pi HQ is certainly not as sensitive as its dedicated all-sky counterparts, which typically have pixels that are 2-3x larger in size, the camera does a decent job of detecting bright stars, airplanes, and satellites. If the camera were equipped with a 1.5 mm lens, the 120 degree FOV would provide more than sufficient coverage for cloud detection purposes.
With that said, I think there is an interesting opportunity here to create an open source / hack-able system that goes well beyond simply detecting stars and clouds. Indeed, for the cost of a single all-sky camera, you not only get a camera, but also a moderately high power computational platform with a plethora of sensor options.
In my next post I will discuss the design and construction of a 3D printed enclosure for this setup.